Instant Compute
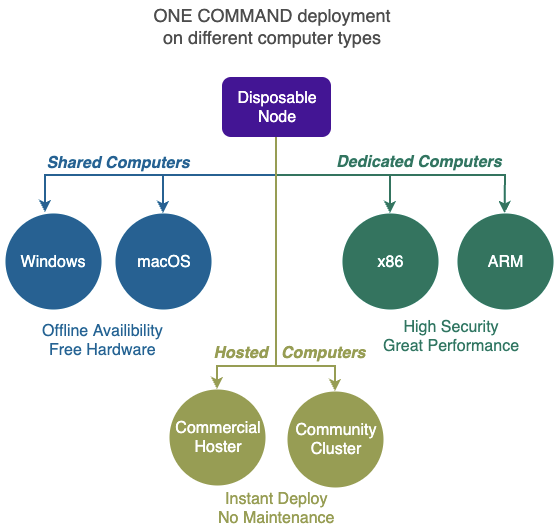
Sharing a computer is a very cost effective and rapid way of deploying Compute Stations.
In most cases you can create a compute station with only ONE COMMAND on billions of existing computers!
It can be ran on Shared Computers with the following operating systems:
- Microsoft Windows - 10 v1803 or later
- Apple macOS - 10.10 or later

With Shared Computers there is no hardware to purchase and no monthly fee to pay.
It is particularly useful when you want direct access to recent data on your Infinite Disk even when you have no network connection (offline). Being inside your laptop also means the convenience of having Infinite Disk with you wherever you bring your laptop.
Versions
Minimum Multipass Version Supported:
1. Microsoft Windows
Disposable Node can run inside a Virtual Machine under Microsoft Windows.
Below are 2 automated ways of running Disposable Nodes on Microsoft Windows computers:
- Multipass provides more features but uses more resources - RECOMMENDED
- Windows Subsystem for Linux (WSL) provides less feature but uses less resources
1.1. Multipass (Windows)
Multipass requires a more powerful machine than WSL but can run ALL Disposable Node available.
This Multipass installation uses Virtual Box in order to support Windows 10 Home computers.
1.1.1 Prerequisites
- Windows 10 or 11, Windows Server 2016 or 2019
- Minimum 4 GByte RAM
- Minimum 100 GByte Free Disk Space
- Administrator privileges
- Internet connection
- No previous installation of Virtual Box
1.1.2. Four Steps
-
Download installnode.cmd from
https://createnode.88.io/winmultipass?token=
Note: you must supply the "Create Node Token" provided to you in your Private Cyberspace. -
Open Command Prompt with "Run as administrator" option, and run the installnode.cmd script for the first time.
-
Once the installation is completed, you'll be prompted to reboot. Press "y" to proceed with a reboot.
-
Open Command Prompt with "Run as administrator" option, and run installnode.cmd script for the second time.
That's it, the Disposable Node should now be visible in your Private Cyberspace!
1.2. Windows Subsystem for Linux
The free Windows Subsystem for Linux (WSL) can be used to run Ubuntu inside Windows 10 and 11.
Although this WSL method takes less resource to run than the Multipass method (described above), some Disposable Nodes (e.g. Infinite Disk) are not supported with WSL, although most Disposable Nodes (e.g. Fuzzy Blockchain) are OK.
1.2.1 Prerequisites
- Windows 10 or 11
- Minimum 4 GByte RAM
- Minimum 100 GByte Free Disk Space
- Administrator privileges
- Internet connection
- No previous installation of WSL
1.2.2. Six Steps
-
Download installnode.cmd from
https://createnode.88.io/wsl?token=
Note: you must supply the "Create Node Token" provided to you in your Private Cyberspace. -
Open Command Prompt with "Run as administrator" option, and run installnode.cmd script.
-
Once the installation is completed, you'll be prompted to reboot. Press "y" to proceed with a reboot.
-
After the machine is rebooted, and you're logged into your account, it'll continue with the remainder of the installation. You'll then be prompted to enter username/password to create a new WSL user account. The installation of WSL is completed now.
-
Open Command Prompt with "Run as administrator" option, and run installnode.cmd script for the second time. This will now run the remaining configuration instructions.
-
Run startnode.cmd to manually start SSH server, and Tinc server. Next time the machine boots up, it'll be done automatically.
That's it, the Disposable Node should now be visible in your Private Cyberspace!
2. Apple macOS
Disposable Node can run inside a Virtual Machine under Apple macOS.
Below are 2 supported ways of running Disposable Nodes on Apple macOS computers:
- UTM (experimental but works on x86-64 and ARM64)
- Virtual Box (stable but works on x86-64 only)
Besides the above 2, other software can also be used to create an Ubuntu Server environment and the same ubuntu one command install will still work.
2.1. UTM
The free Universal Turing Machine (UTM) can be used to run Ubuntu inside macOS on both x86-64 or ARM64 computers.
3.1.1 Prerequisites
- macOS 11 or 12
- Minimum 4 GByte RAM
- Administrator privileges
- Internet connection
- No previous installation of UTM
Instructions are here:
2.1.2 One Command
After the installation of Ubuntu inside UTM on macOS, just use the same ONE COMMAND for Ubuntu above.
2.2. Virtual Box (macOS)
VirtualBox is for x86-64 only and will NOT work on new Apple machines with ARM64 processors.
2.2.1 Prerequisites
- macOS 11 or 12
- Minimum 4 GByte RAM
- Administrator privileges
- Internet connection
- No previous installation of VirtualBox
The recommended Virtual Machine software for macOS is the free VirtualBox.
Instructions are here:
https://ubuntu.com/tutorials/how-to-run-ubuntu-desktop-on-a-virtual-machine-using-virtualbox#1-overview
Further Reference:
https://brb.nci.nih.gov/seqtools/installUbuntu.html
3.2.2 One Command
After the installation of Ubuntu inside VirtualBox on macOS, just use the same ONE COMMAND for Ubuntu above.
3. Apple iOS
EXPERIMENTAL
Running Disposable Nodes inside a Virtual Machine on Apple iOS is NOT for the faint-hearted.
Even with earlier versions (iOS 11, 12 ,13) you still need to use sideloading to run Ubuntu on iOS, with the recent iOS versions you need to jail break the phone.
For geeks who love a challenge, this is the app we have been playing with:
4. Google Android
EXPERIMENTAL
Running Disposable Nodes inside a Virtual Machine on Google Android is increasingly difficult as more restrictions are placed on non-Google software with every new Android release.
Recent releases (e.g. Android 12) made it very hard to run Ubuntu in the background without rooting the phone.
For geeks who love a challenge, these are the apps we have been playing with: