Steps
Get started instantly with a list of preloaded applications curated by your Application Integrator and progressively customise and increase value of your collected information assets by mixing and matching an unlimited number of applications in your cyberspace e.g. just GitHub has more than 125 miilion software listed!
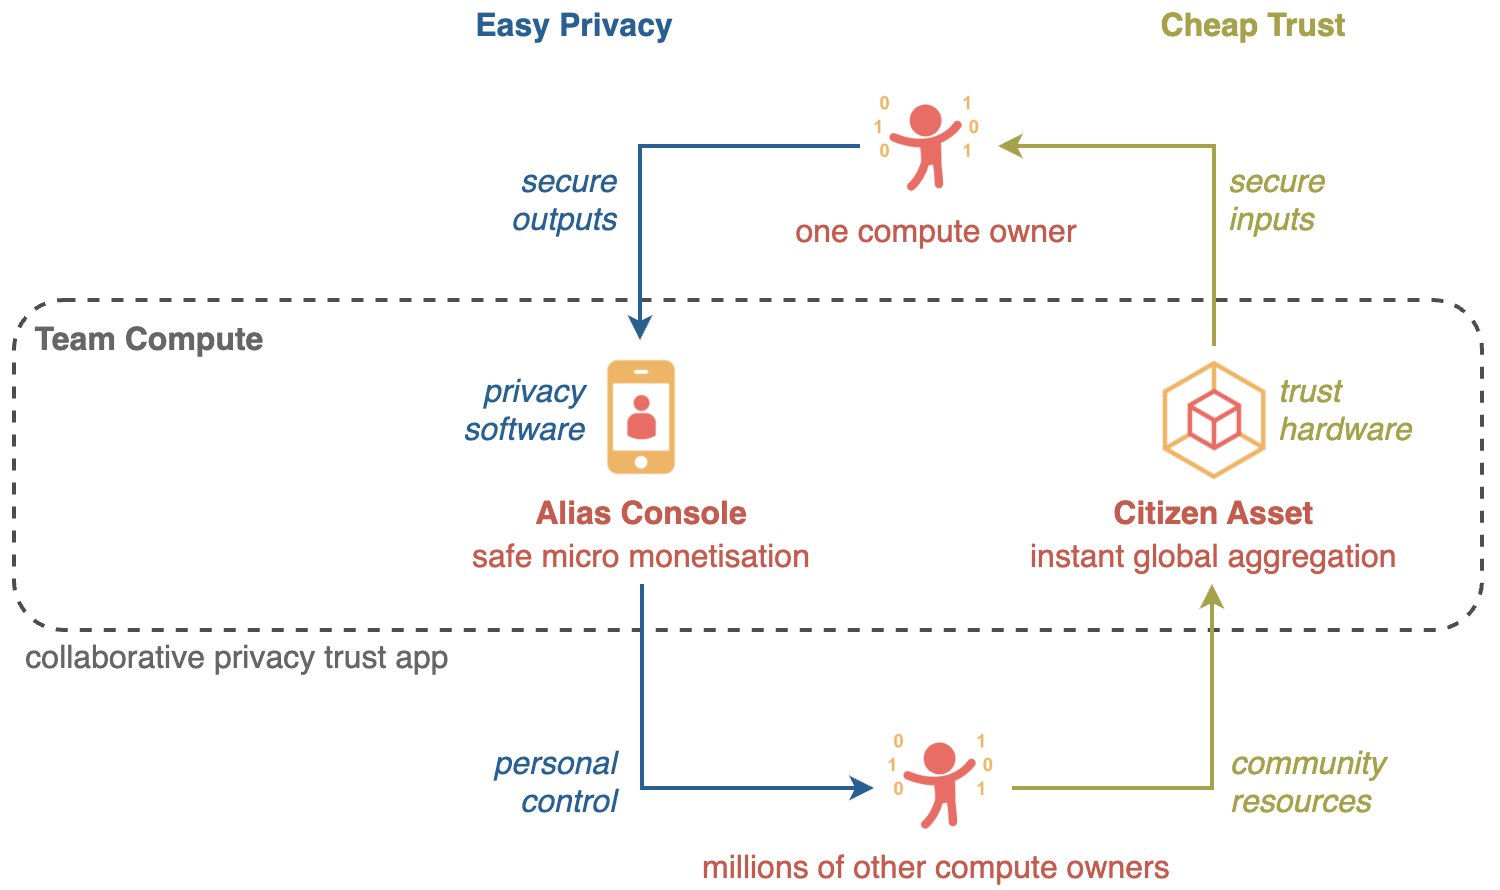
By default there is NO sharing of data when your Private Cyberspace is first created, your Guest Alias is for data collection only, allowing you to build up your information asset privately for your own personal use.
When you are ready, you can create multiple Associate or Member Aliases to interact or collaborate with external parties. A citizen energised information ecosystem is a computing paradigm shift, with so many brains (humans and machines) working together, every application is a game changer.
Location
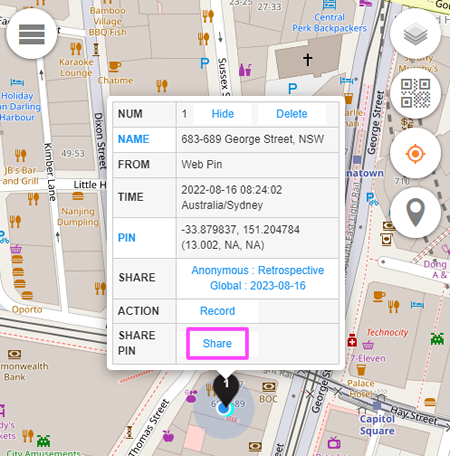
Share Pin
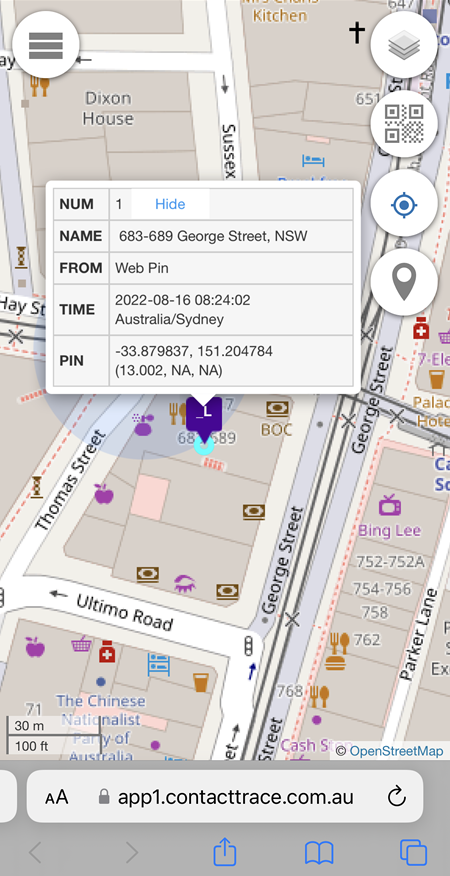
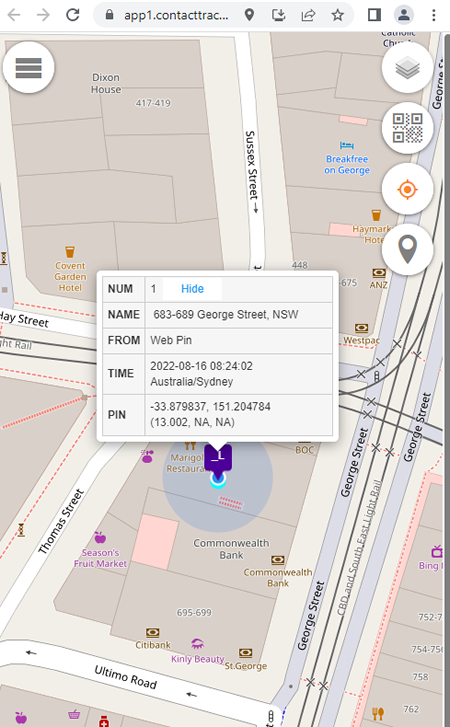
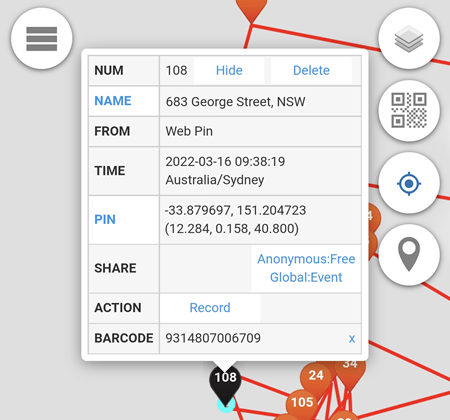
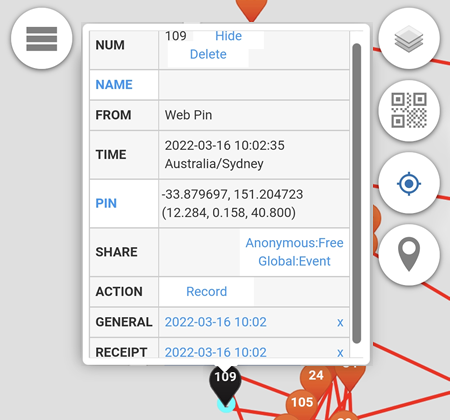
Every location pin on the app.contacttrace.com.au map has a unique URL that can be shared to other users. In the example below, a Web Pin is used and a pop-up window appears when the pin is selected.
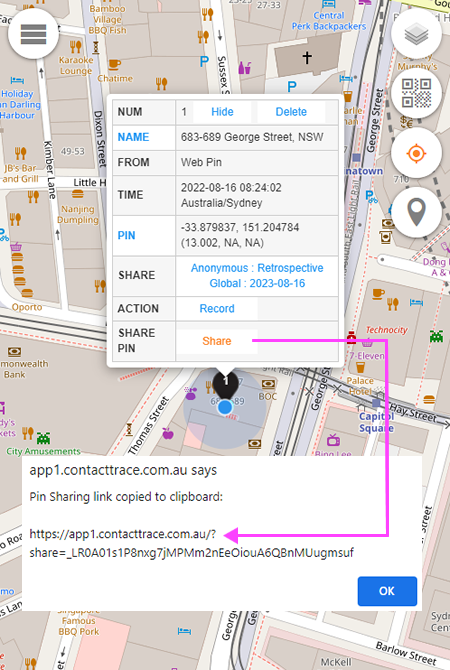
The unique URL is revealed and it is automatically copied to the clipboard when the Share link is selected.
This URL can be shared via email, SMS, instant messaging apps etc.
Note: Whether it is a Web Pin, a Touch Pin, a QR pin or a Phonetrack pin, the shared pin is always displayed using a purple square icon.
The icon will always have two characters which are the first two characters from the URL after the word share=
In this example, the URL is https://app1.contacttrace.com.au/?share=_LR0A01s1P8nxg7jMPMm2nEeOiouA6QBnMUugmsuf therefore characters _L are displayed on the purple square icon.
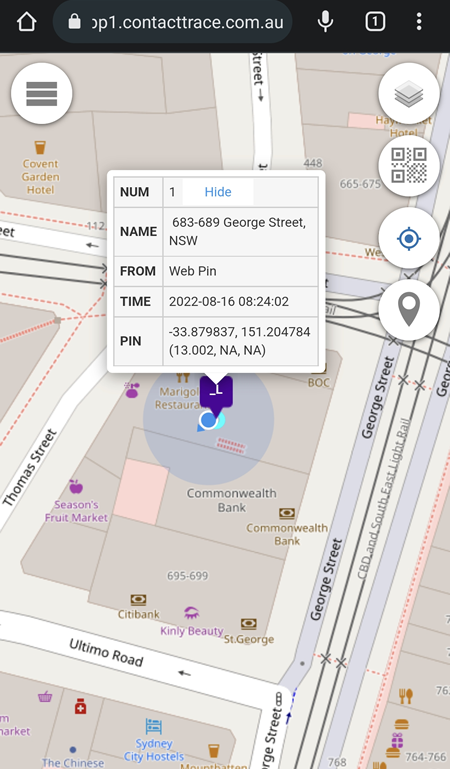
Shared pin using the unique URL on an Android device.
Shared pin using the unique URL on an iOS device.
Shared pin using the unique URL on a Windows device.
Auto Pin
Auto Pin tracks movement and submit Web Pins automatically to the map. To enable this feature, go to CITIZEN TIMELINE -> Area Entity -> Daily Map -> Settings -> Set Auto Pin to ON
Once set to ON, the movement will be tracked automatically.
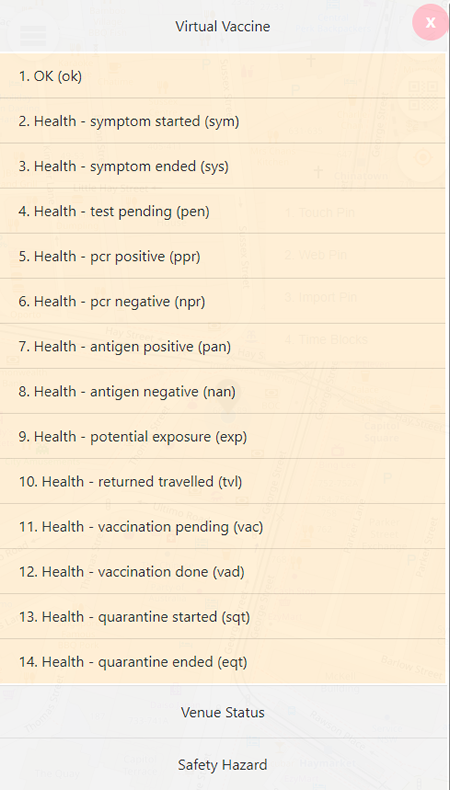
Status
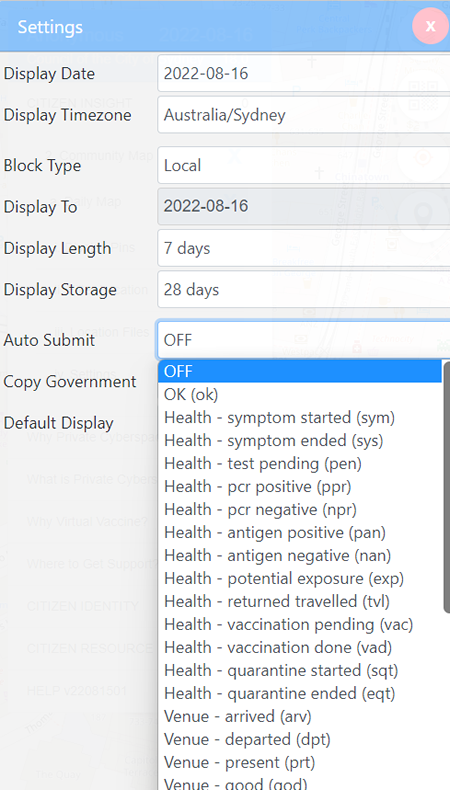
| No |
Virtual Vaccine |
Venue Status |
Safety Hazard |
| 1 |
OK (ok) |
Venue - arrived (arv) |
Walk - trip hazard (pth) |
| 2 |
Health - symptom started (sym) |
Venue - departed (dpt) |
Walk - slip hazard (psh) |
| 3 |
Health - symptom ended (sys) |
Venue - present (prt) |
Walk - fall hazard (pfh) |
| 4 |
Health - test pending (pen) |
Venue - good (god) |
Drive - pot hole (rph) |
| 5 |
Health - pcr positive (ppr) |
Venue - bad (bad) |
Drive - road delay (rdd) |
| 6 |
Health - pcr negative (npr) |
Venue - missing person (mpr) |
Drive - road blocked (rdb) |
| 7 |
Health - antigen positive (pan) |
Venue - lost property (lpr) |
Drive - road breakdown (rbh) |
| 8 |
Health - antigen negative (nan) |
Venue - help required (hrq) |
General - flooding hazard (rfh) |
| 9 |
Health - potential exposure (exp) |
Venue - safety alert (sat) |
General - fire hazard (rih) |
| 10 |
Health - returned travelled (tvl) |
-- |
General - crime hazard (rch) |
| 11 |
Health - vaccination pending (vac) |
-- |
General - active shooter (ras) |
| 12 |
Health - vaccination done (vad) |
-- |
General - accident scene (rah) |
| 13 |
Health - quarantine started (sqt) |
-- |
Speed - my maxspeed (mms) |
| 14 |
Health - quarantine ended (eqt) |
-- |
Speed - other maxspeed (oms) |
Session Map
Session List
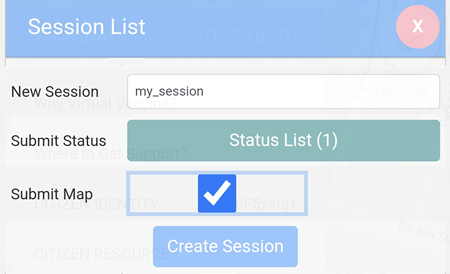
An Anonymous alias or higher and a minimum of one coin earned are required. A coin is earned when a status is submitted on a Location pin.
To create a new session, go to CITIZEN INSIGHT -> Community Map -> Session Map -> Session List.
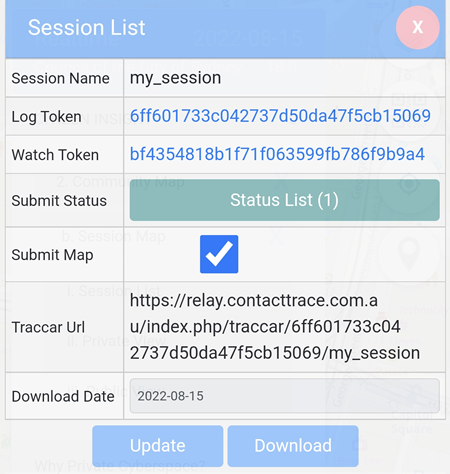
Once created, it will be shown as below.
An app called Traccar can be installed and configured to automatically log your movement by putting the Traccar Url above in the Server URL of the app as below.
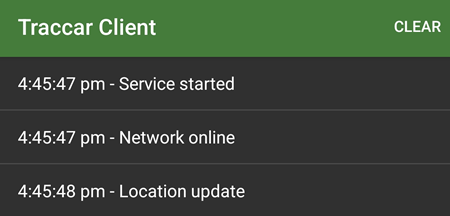
The Traccar app will display Location Update if the connection to the server is successful.
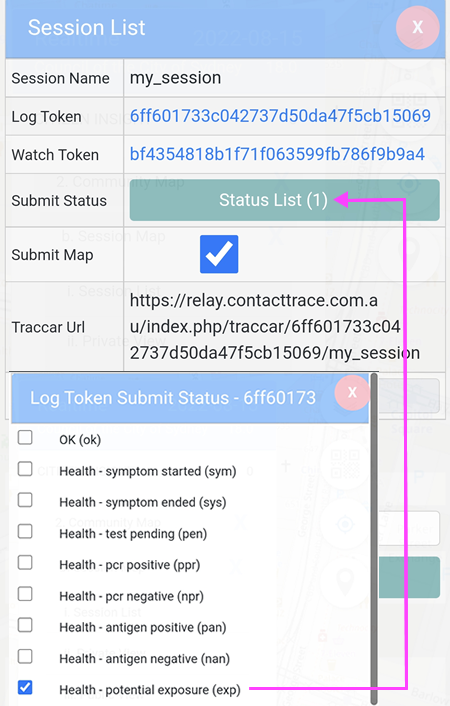
In addition to logging the movement, if a Status is enabled in the Status List, it will also broadcast the status to other users in the same area block who are within the same 30 minute block. In the example below, Health - potential exposure (exp) status is enabled.
Other users who have Health - potential exposure (exp) Realtime notification enabled in the same area block and within the same 30 minute block as the Traccar user above, will get the alert automatically via a ringtone to their mobile devices.
Venue
Venue verification
A Member alias is required for using the Venue function.
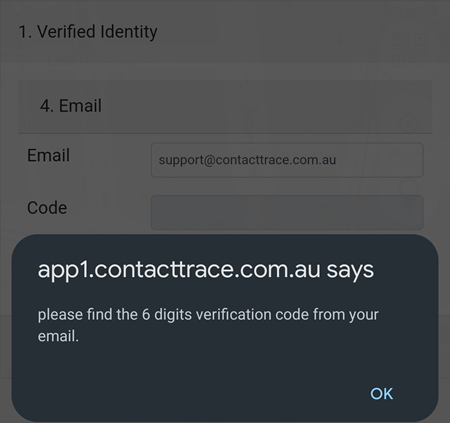
- Go to PERSONAL ENTITY -> Dynamic Alias -> Verification -> 4. Email. Enter your email address and click on the Get Code button. In the example below, the email address used is support@contacttrace.com.au.
- Click on the Get Code button to get the 6 digit verification code sent to the email address.
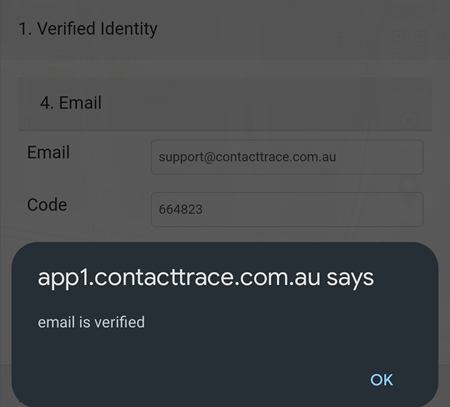
- Enter the verification code and click on the Verify button. If successful, a confirmation window will be displayed.
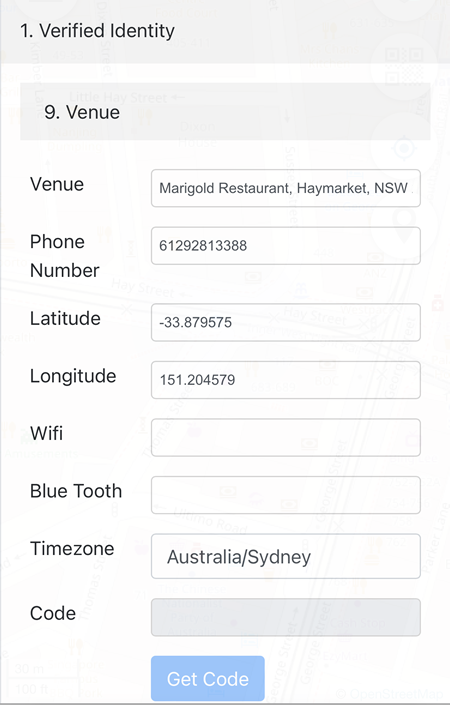
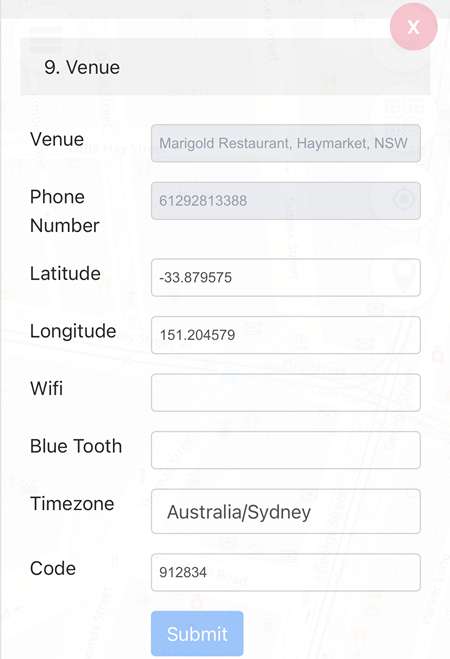
- Go to PERSONAL ENTITY -> Dynamic Alias -> Verification -> Venue. The Venue and Phone fields are required and in the example below, the Venue is Marigold Restaurant, Haymarket, NSW 2000 and the Phone is 61292813388 which is the phone number of the venue. The Latitude and Longitude values are automatically added and the WiFi and Bluetooth fields are optional.
-
Click on the Get Code button and the system will dial the venue's phone number and read out the 6 digit verification code. Please note: the phone number MUST belong and match to the venue and the verification code MUST be entered within a minute. If there is an error displayed, it means the venue's phone number does not match or the code is entered more than 1 minute after it was read out.
-
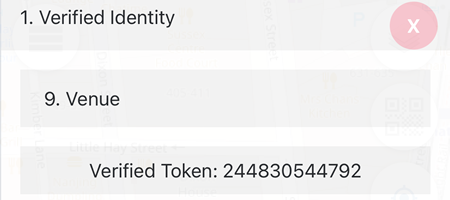
If successful, a confirmation window will be displayed.
- A new menu called Qr Log will be available under PERSONAL ENTITY -> Dynamic Alias -> Qr Log.
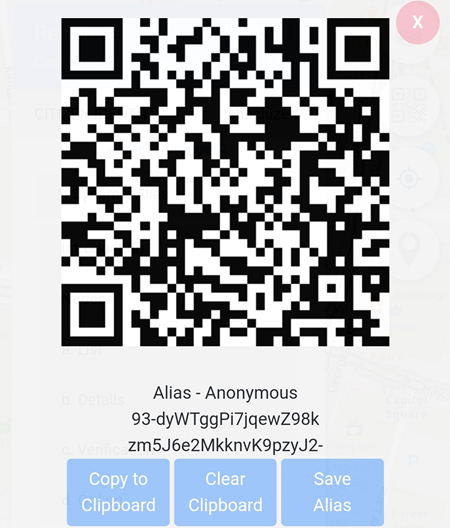
Verified Venue QR Code
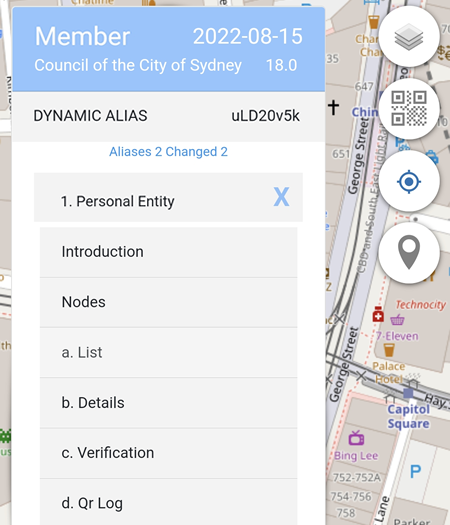
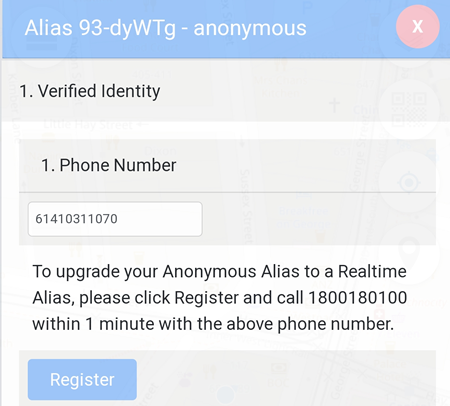
The verified venue QR code is located on PERSONAL ENTITY -> Dynamic Alias -> List -> select the top row of the Alias ID table. In the example below, the Alias ID is 93-dyWTg.
Once selected, the QR Code will be displayed and users can scan this QR code on their devices.
For the users
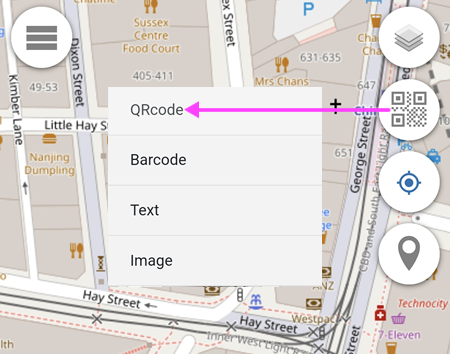
- An Anonymous Alias ID or higher is required. Open https://app.contacttrace.com.au, use the Camera Scanner button and select QRcode.
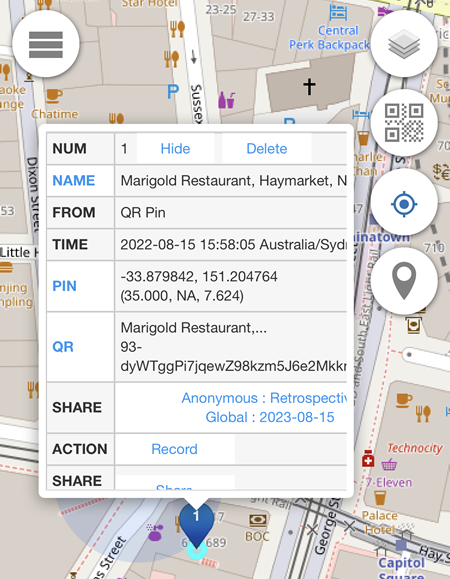
- Scan the QR code of the verified venue. In the example below, the Marigold Restaurant venue is used and the location pin is created automatically after a successful QR Code scanning.
For the venue's owner
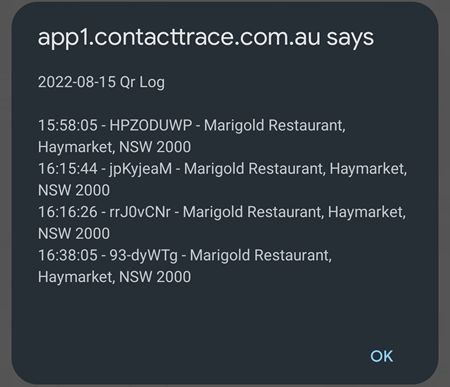
To view the daily log, go to DYNAMIC ALIAS -> Personal Entity -> Qr Log, select the Log Date and click on the Submit button. In the example below, the log date selected is 15-Aug-2022. In the result, 4 Alias IDs at 4 different times are used to scan the venue.
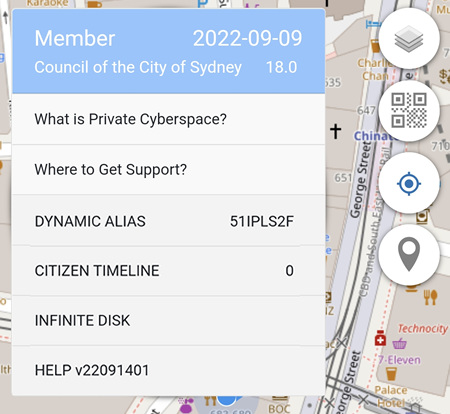
Dynamic Aliases
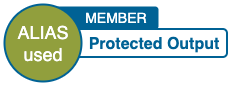
Member Alias
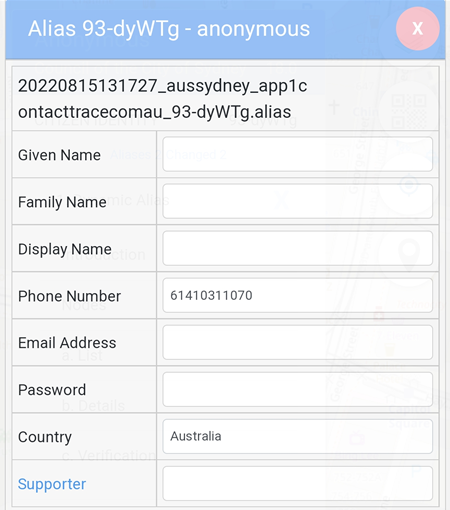
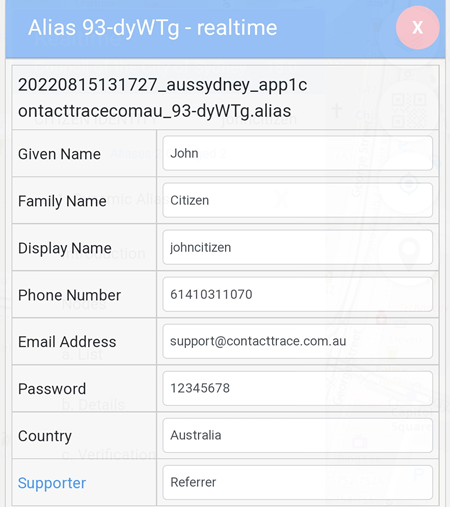
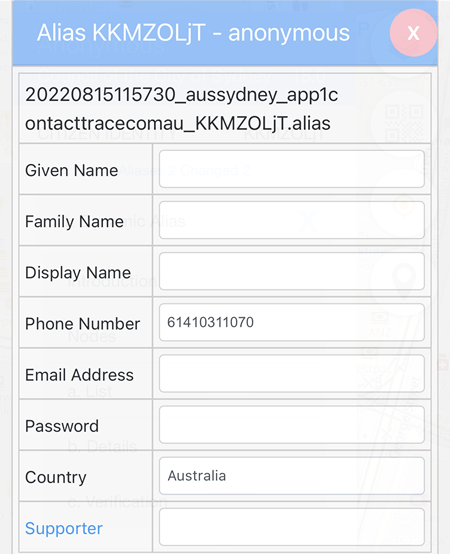
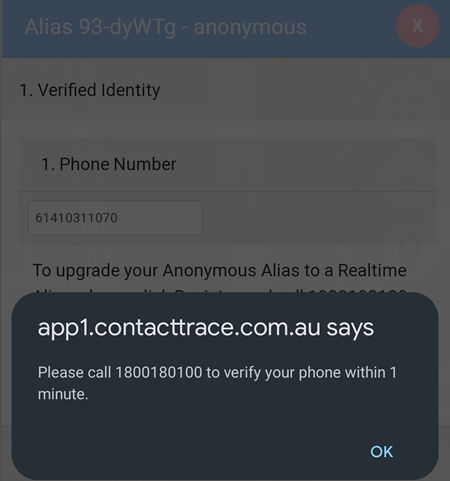
To upgrade from Anonymous alias to Member alias, go to DYNAMIC ALIAS -> Personal Entity -> Details and enter the phone number. In the example below, the phone number is an Australian mobile number 61410311070.
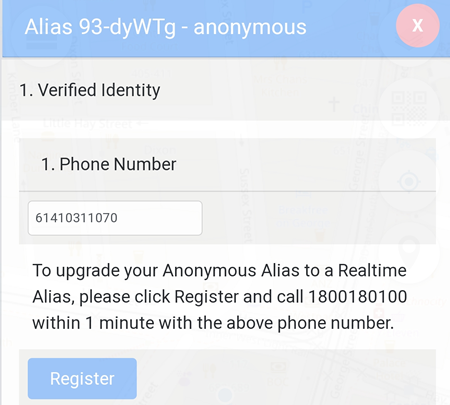
The next step is to enable the phone number verification. Go to DYNAMIC ALIAS -> Personal Entity -> Verification -> 1. Phone Number and select the Register button.
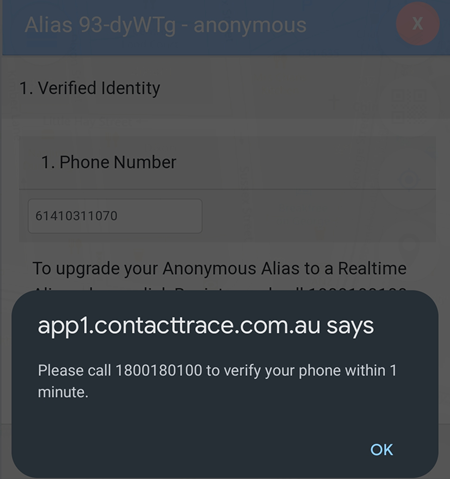
You have a minute to ring 1800 180 100 to have the number verified. If it is more than a minute, please click on the Verify button again.
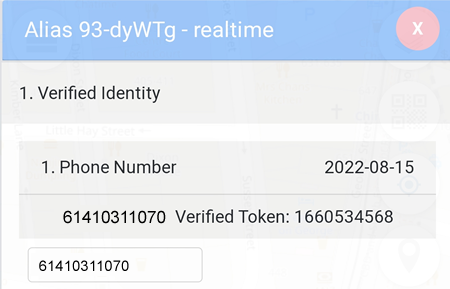
Once the number has been verified, a verified token will be displayed.
The MEMBER status is also shown.
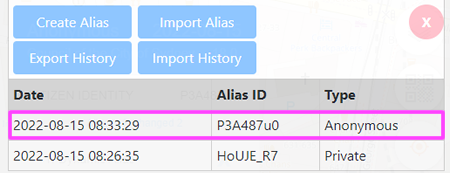
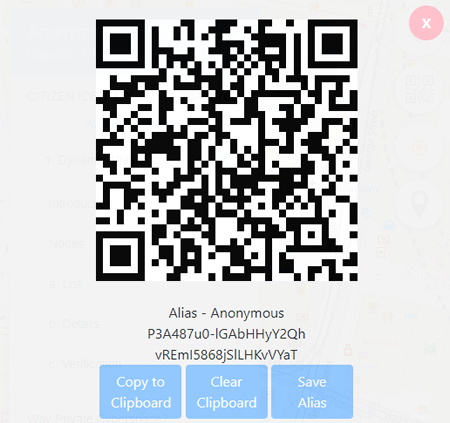
Save Alias ID
The Alias ID created can be saved to the device, to the remote server or both. This is useful if the browser's cache has been cleared and the user wants to use the same Alias ID.
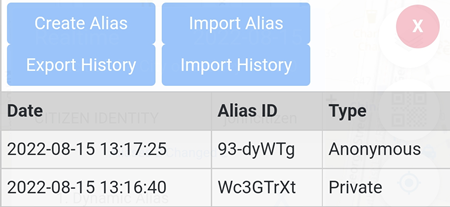
To save the Alias ID, click on the row that shows the Alias ID to be saved. In the example below, the Associate Alias ID is selected.
Click on the Save Alias button and follow the prompt.
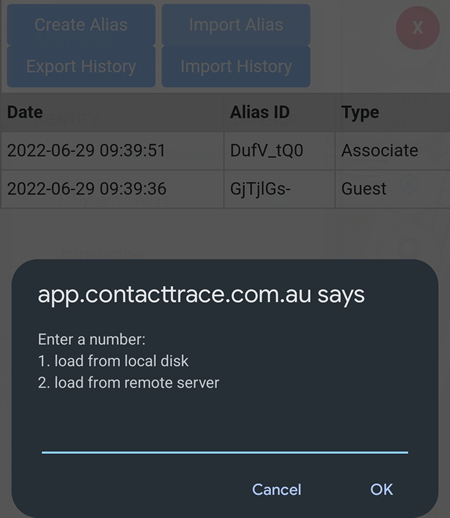
Load Alias ID
To load the Alias ID saved in the device or on the remote server, click on the Import Alias button.
Select the location of the saved Alias ID by entering 1 or 2,click on the OK button and follow the prompt.
Details
To store your contact details, go to DYNAMIC ALIAS -> Personal Entity -> Details. Supporter will turn of the camera of the device so it can scan the referral's QR Code alias.
Verification
Certain functions of the app can only be accessed if the alias is a Member alias and in order to upgrade from the Anonymous alias to Member alias, a Phone Number must first be verified. The more things verified, the more functions are accessible.
In the example below, the user's Phone Number and Credit Card have been verified.
A Member alias is also required for using the Venue function. In the example below, the venue used is Marigold Restaurant, Haymarket, NSW 2000
Click on the Get Code button to have the 6 digit code sent to the phone. In the example above, the phone number used is 61292813388. Enter the code and click on the Submit button.
If the venue has been verified successfully, the token will be displayed.
Anonymous Interaction
Custom Ringtone
Custom Ringtone notification is only available to Associate and Member Aliases.
Available "Send Phone" numbers:
61282050080
61282050081
61282050082
61282050083
61282050084
61282050085
61282050086
61282050087
61282050088
61282050089
61282050090
61282050091
61282050092
61282050093
61282050094
61282050095
61282050096
61282050097
61282050098
61282050099
Custom Ringtone Set Up
There are two types of Ringtone:
- Alias
- Status
Both ringtone types require an Anonymous alias or higher.
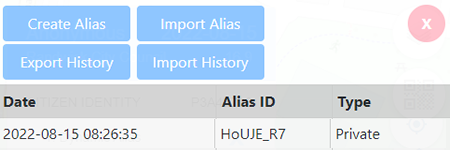
Go to DYNAMIC ALIAS -> Personal Entity -> List. If the Type in the table top row is Private, click on the blue Create Alias button to upgrade the status to Anonymous which will also creates the Wallet.
Once the alias has been upgraded, go to DYNAMIC ALIAS -> Personal Entity -> Details -> Enter the mobile number of the device in the Phone Number field. In the example below, 61410411070 which is an Australian mobile number is used.
Alias Ringtone
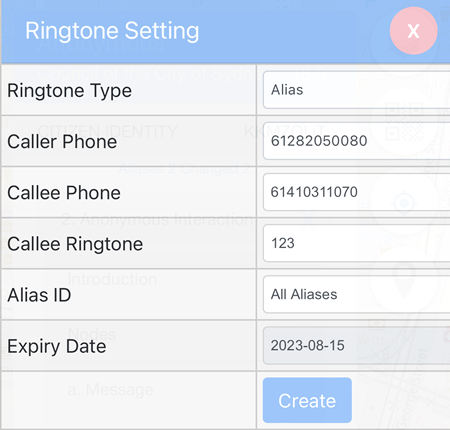
To set up an Alias ringtone, go to DYNAMIC ALIAS -> Entity Agent -> Ringtone.
Caller Phone = the Caller ID (DNIS number) displayed on the receiving mobile phone
Callee Phone = the receiving mobile phone number
Caller Ringtone = the unique digits used by senders to ring you
Alias ID = receive calls from all aliases
Expiry Date = ringtone will no longer active after this date
If the Alias ringtone has been successfully created, it will be shown as below.
Once the Alias ringtone has been set up, using the above example mobile number 61410311070 will ring if a user sends a message using the Alias ID of mobile number 61410311070 and Text code 123.
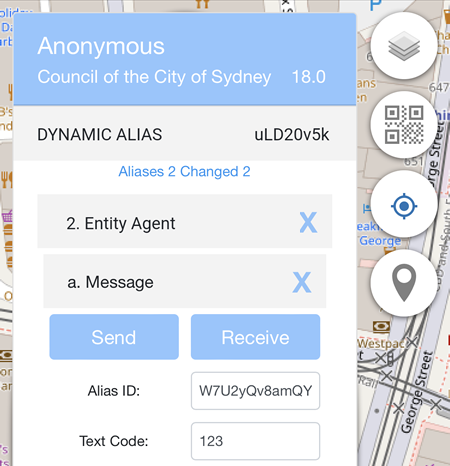
To send a message, go to DYNAMIC ALIAS -> Entity Agent -> Message. In the example below, the receiver's Alias ID is dBYcWJksjmWC2.... (40 alphanumeric characters).
The Receive button is to check the text messages received using the Alias ringtone.
Status Ringtone
To set up a Status ringtone, the mobile number must first be verified. Go to DYNAMIC ALIAS -> Personal Entity -> Verification -> Verified Identity -> Phone Number -> click on the Verify button.
Please ring 1800 180 100 within a minute to have the mobile number verified.
Once the number has been verified, go to DYNAMIC ALIAS -> Entity Agent -> Ringtone.
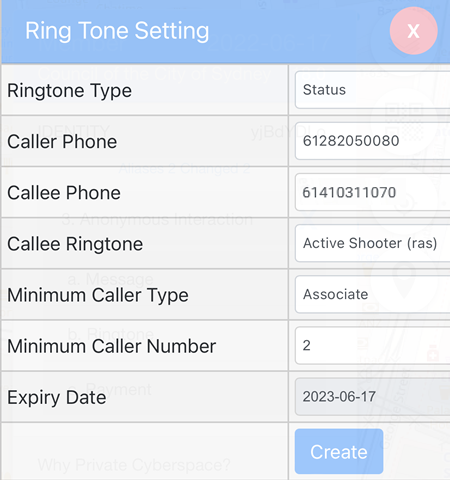
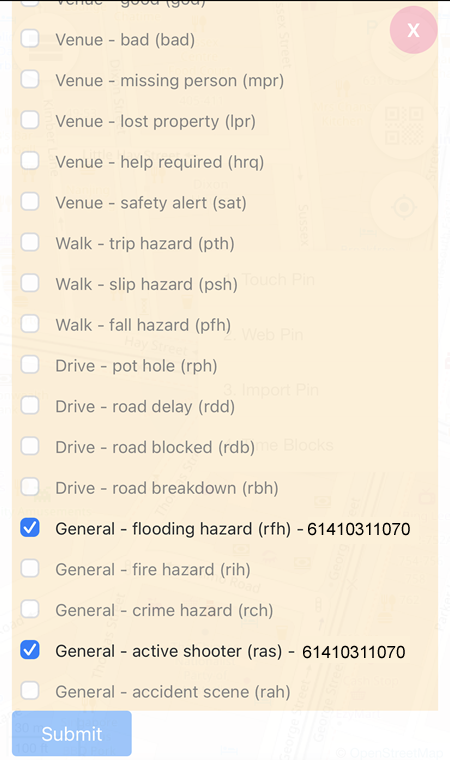
Active Shooter Example
In the example below, Active Shooter status is used.
Caller Phone = the Caller ID (DNIS number) displayed on the receiving mobile phone
Callee Phone = the receiving mobile phone number
Caller Ringtone = the ringtone will be triggered when the status submitted is Active Shooter (ras)
Minimum Caller Type = the ringtone will be triggered if the status submitted by users who have an Associate alias or higher
Minimum Caller Number = the ringtone will be triggered when there are two of more users who submit the Active Shooter (ras) status
Expiry Date = ringtone will no longer active after this date
If the ringtone has been created successfully, it will be shown as below.
For more details on using Custom Ringtone, please visit the user guide for android or ios
The status Ringtone can be used in two different ways:
- Block Notification
- Realtime Notification
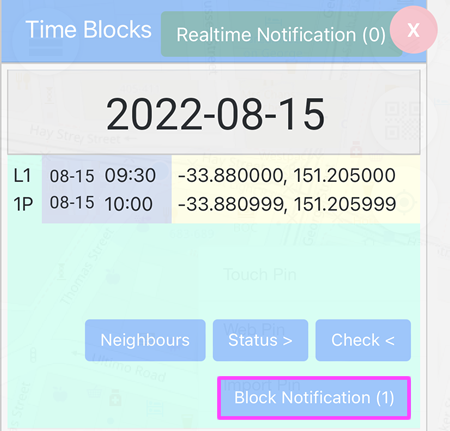
Block Notification
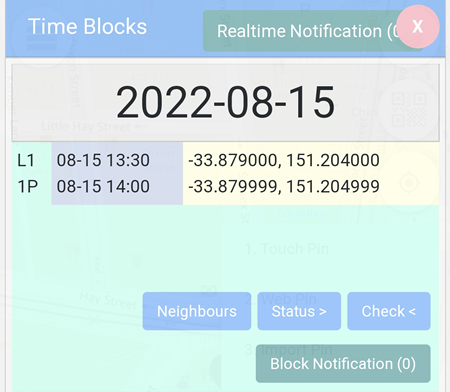
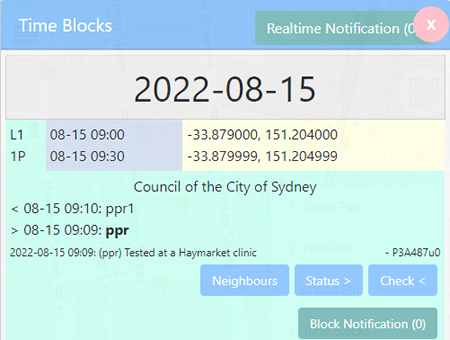
In order to enable the Status Ringtone to a particular area block, go to the Add Location Pins button, -> Time Blocks and select the Block Notification button.
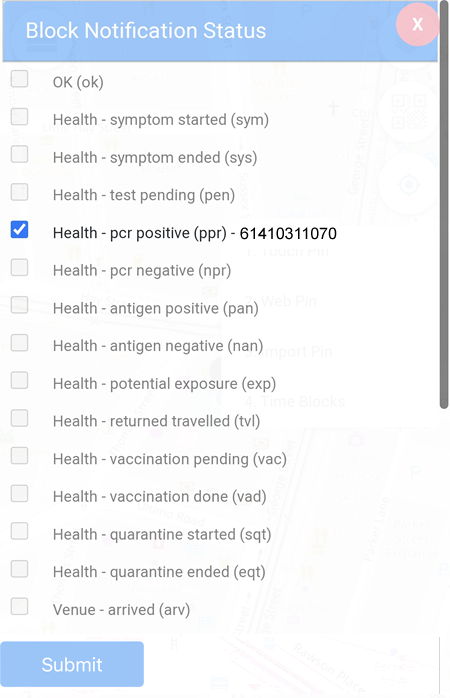
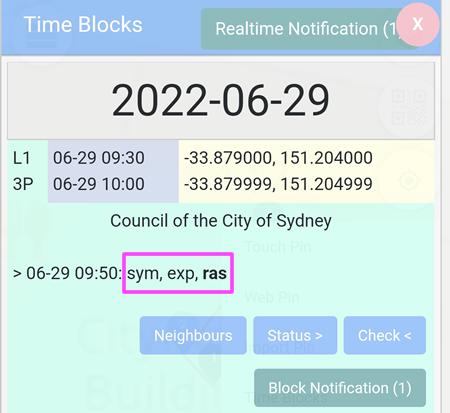
Select the Block Notification to be enabled. In the example below, the Health - Positive PCR (ppr) block notification has been selected. Select the Submit button to have this status enabled.
Once enabled, the Block Notification button will display the number of enabled notification. In the example below, there is one enabled notification.
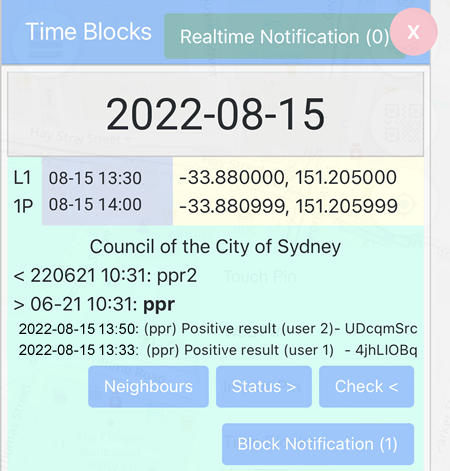
Users who enable the Health - positive PCR (ppr) status block notification within the same area block and within the same 30 minute block will trigger their devices to ring, when the Positive PCR (ppr) status is submitted and the number of minimum callers set is reached.
To check the message sent by each user (if any), simply select on the Check button. In the example above, the messages sent from the two users are User 1 at 13:33 and User 2 at 13:50.
Please note:
Block Notification is based on when the Block Notification is first enabled, e.g: a Block Notification with Positive Result status is enabled on User 1's phone at 13:32 and on User 2's phone at 13:48. User 1 submits the Positive Result status at 13:33 and User 2 submits the Positive Result status at 13:50. This will trigger both devices to ring.
Realtime Notification
The Realtime Notification is triggered for all newly added pins after the Realtime Notification has been enabled. In the example below, all newly added pins with the General - flooding hazard (rfh) or General - active shooter (ras) enabled within the same area block and within the same 30 minute block will trigger the system to ring all the devices.
Please note:
This notification remains active indefinitely for all newly added pins, however the status is checked per 30 minute block. Example: a Flooding Hazard (rfh) status is enabled at 12:00, then all pins added with the Flooding Hazard Realtime Notification enabled from 12:00-12:30 will trigger all devices to ring, if the minimum number of callers set is reached.
Payment
There are currently three accepted different payment methods:
- Credit Card (credit card verification required and only Visa and Mastercard are accepted)
- BPay
- Bank Deposit
The minimum Alias ID top-up amount is $20.00.
Wallet
Console
Console indicates the number of blocks which have been submitted.
Every time there is a pin added, whether it is a Web pin, a Touch pin, a QR pin or an Imported pin and a Status is submitted, it will be reflected in the Console number.
Example:
Three pins added.
Status submitted.
Three different status submitted, but they are within the same block.
The Console number is 1 although the number of status submitted is 3, because all are within the same block.
Click on the Console and a new window will display the number of status submitted (one "Y" indicates one status submitted). In the example below, there are three different status submitted.
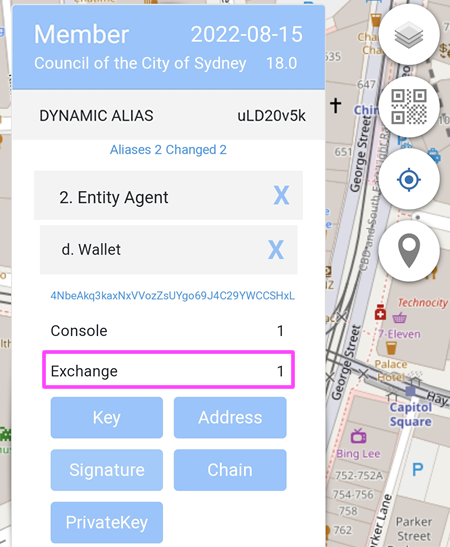
Exchange
Every time a pin is added and a status is submitted, it will also be reflected in the "Exchange" number, which is the number of coins earned.
However, if there is one or more submitted pins in the same block and within the same 30 minute block as the the other pins, only the "Console" will reflect the number of submitted status (the number of "Y") and not the "Exchange" number.
Citizen Timeline
Virtual Vaccine
Although your Private Alias gives you perfect memory (e.g. history of your movements), when there is a large outbreak, it might takes too long to be notified out-of-band (e.g. through TV news) that you might be exposed and wait for you to submit your movement manually.
When there is an outbreak you can OPTIONALLY use your Anonymous Alias to submit some of your data to the Citizen Timeline under the protection of novel technologies like Dynamic Alias and Fuzzy Block.
Instead of submitting data directly to the government, Citizen Timeline allows your data to be processed and shared differently under your FULL CONTROL depending on the current threat level.
- Private Alias can be used in Defensive Mode - when there is no outbreak. You do NOT have to submit any data to Citizen Timeline, only basic automatic logging on your phone and manual scanning of mandatory QR codes, thus saving battery, data traffic and manual effort.
- Anonymous Alias can be used on Offensive Mode - when there is an outbreak. You can send your privacy protected data into the Citizen Timeline, turn on intensive automatic logging and perform frequent manual scanning of voluntary QR codes or tapping on Virtual Markers in locations without QR codes.
The anonymity and speed of Exposure Notifications sent by the Citizen Timeline are controlled by the citizens themselves based on their own circumstances.
Citizen Timeline uses blockchains to scale up linearly according to demand and to protect against bad citizens with malicious intents. The more citizens, the more data, the more devices, the more anonymity, the more security.
4. Daily Map Usage
Personal Console has a Daily Map in front, showing your movements and all the assets you have collected for EACH DAY.
Scrolling though the different days on the Daily Map is like flipping through a multimedia diary of your life. The more details you put into the Daily Map, the more insights you can gain from it and the more contributions you can potentially make using it.
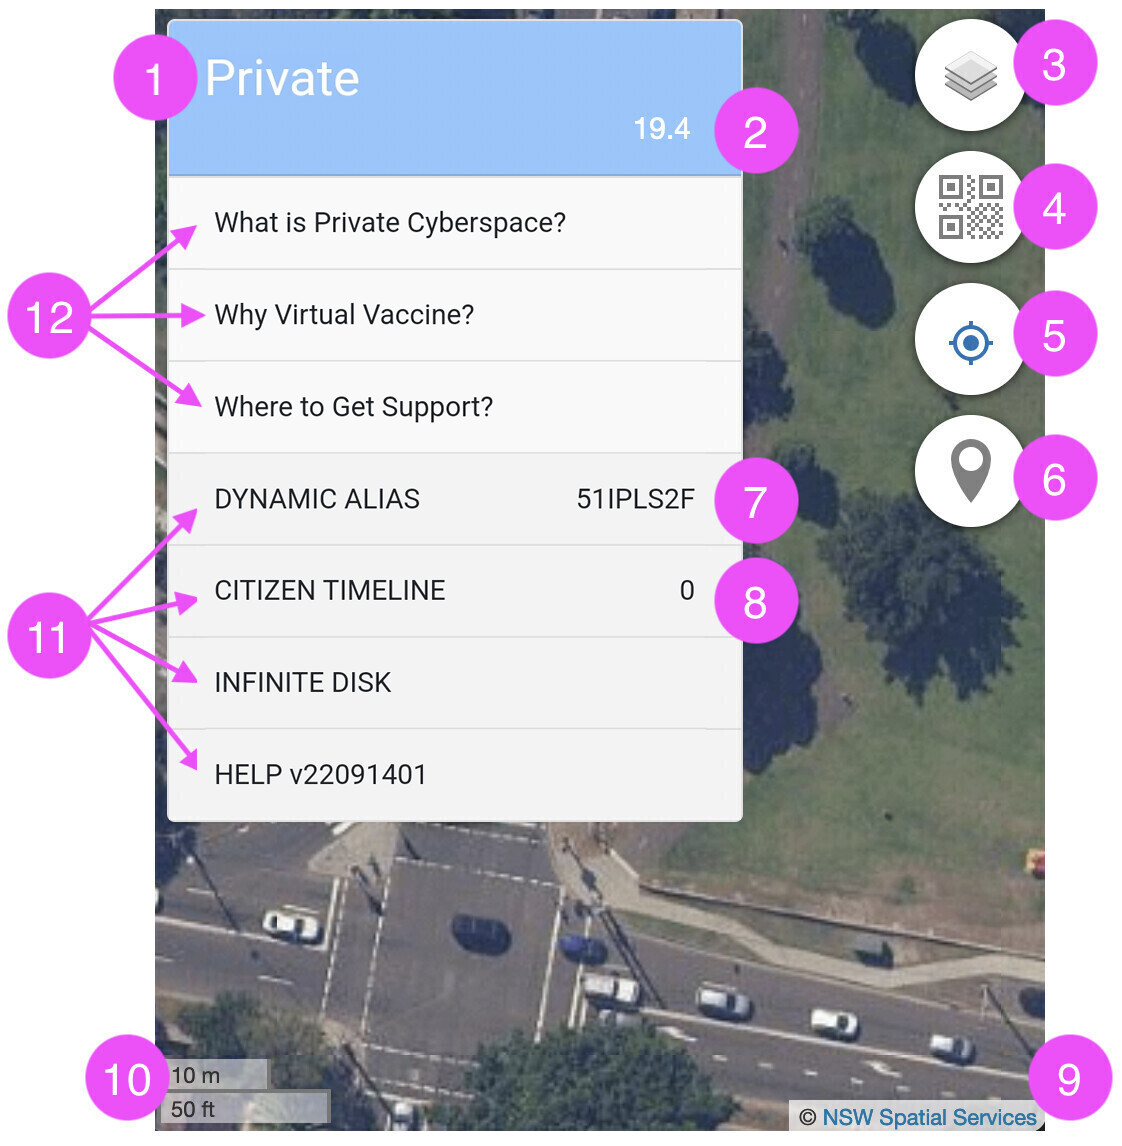
When you first install app.contacttrace.com.au the following will be shown:
| Personal Console |
initial display explained |
| 1 - Alias Type |
2 - Zoom Level |
| 3 - Background Map |
4 - Camera Scanner |
| 5 - Current Location |
6 - Location Pins |
| 7 - Dynamic Alias |
8 - Number of Alerts |
| 9 - Map Copyright |
10 - Map Scale |
| 11 - Application Menu |
12 - Notification List |
-
Items in the Notification List will NOT be shown again, after being click on once.
-
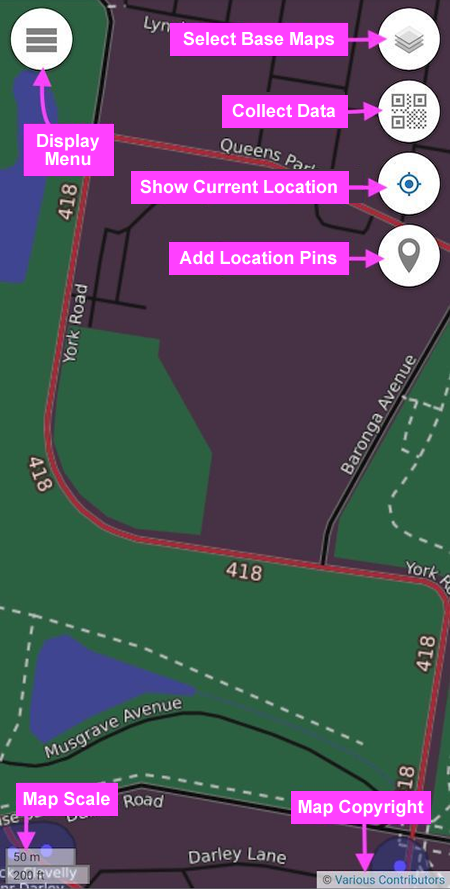
Base Map button displays different Base Maps as the background. The sample above is using the Transport Base Map, you can see the bus route number 418 along the roads. Besides picking different Base Maps for different purposes, you can also edit those maps online by just clicking the "Edit" button.
-
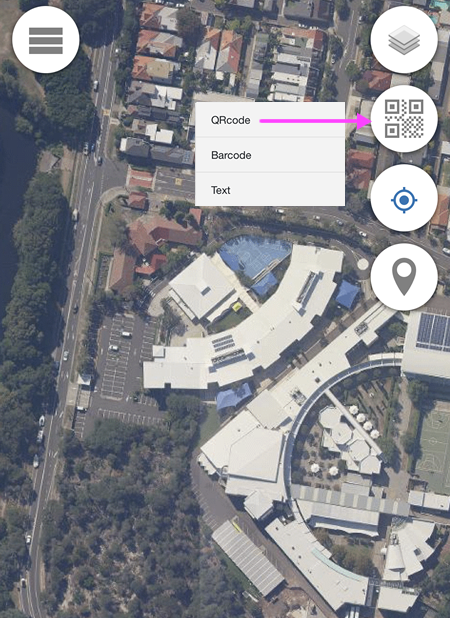
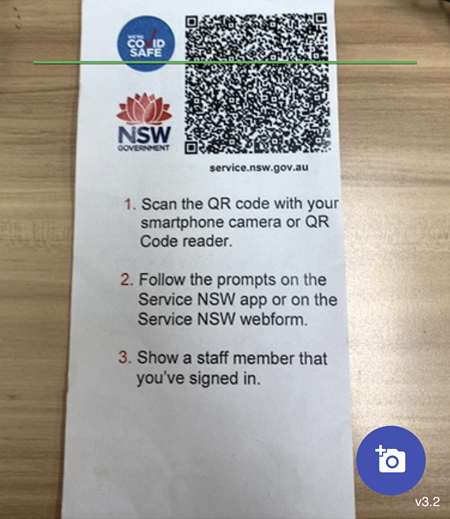
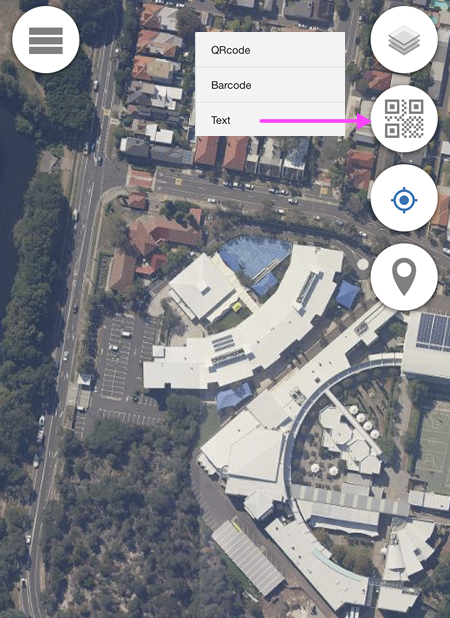
Camera Scanner can scan most QR codes, Barcodes and Text for contact tracing (e.g. bus shops QR codes, Alipay Wechat QR codes, product Barcodes, all COVID QR codes worldwide).
-
Current Location button shows you rapidly where you currently are on the map (and depending on your phone might also show the direction you are facing).
-
Add Pin button enables you to put locations you have visited on the map.
-
Menu button allows you to select the easy One Button Contact Trace Mode or the full featured Advanced Mode.
-
Copyright button gives you more details on the creators of the displayed Base Map
4.1. Location Pins
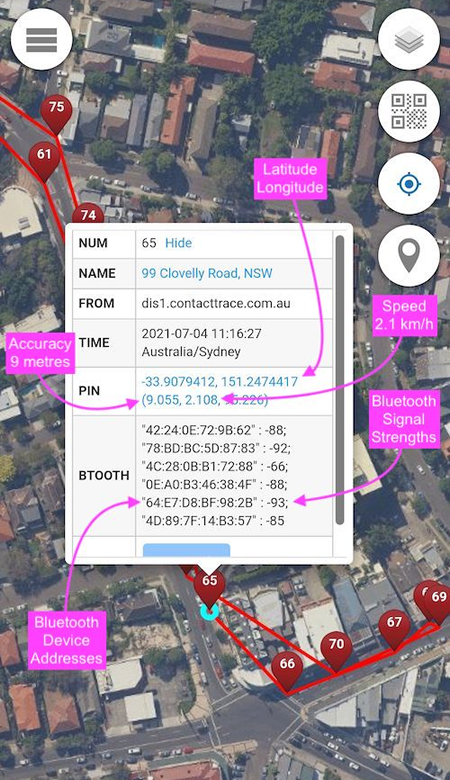
Location Pin is an easy and powerful way of collecting information about you and your environment.
They do not just tell you locations on the map, you can attach ANY sort of useful information onto each of them e.g. food orders, people names, shopping receipts, wifi signals etc.
The more pins you collect
- the more details you have to TRACK down the virus
- the better insight you GAIN into your lifestyle
- the more data you can SELL to potential buyers
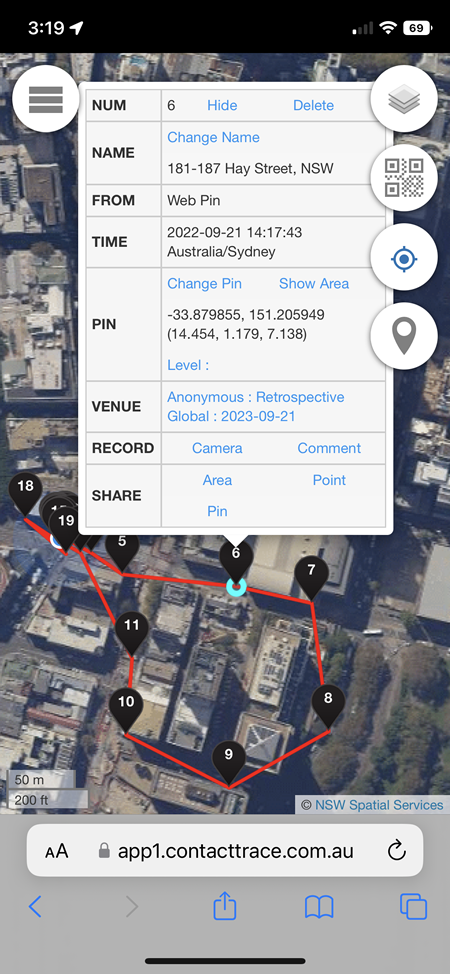
The Pins are all numbered from the beginning of each day. So the first pin of the day is number 1, then 2, then 3 etc.
To help you see where the data for each pin came from easily, they can have different colours.
 Manual Pin
Collected manually by touching the exact location on the map or from manual survey software
 Alert Pin
Event outstanding (e.g. waiting for verification)
 Automatic Pin
Collected automatically by phone applications (e.g. owntracks, home assistant, GNSS mobile apps)
 QR Pin
Placed by scanning QR codes
 Web Pin
Placed by using current geolocation from web browser
 Name Pin
Placed by selecting from a list of names of venue nearby
 Highlight Pin
Set by owner or application for important event (e.g. geo88io.apk)
4.2. Increasing Accuracy
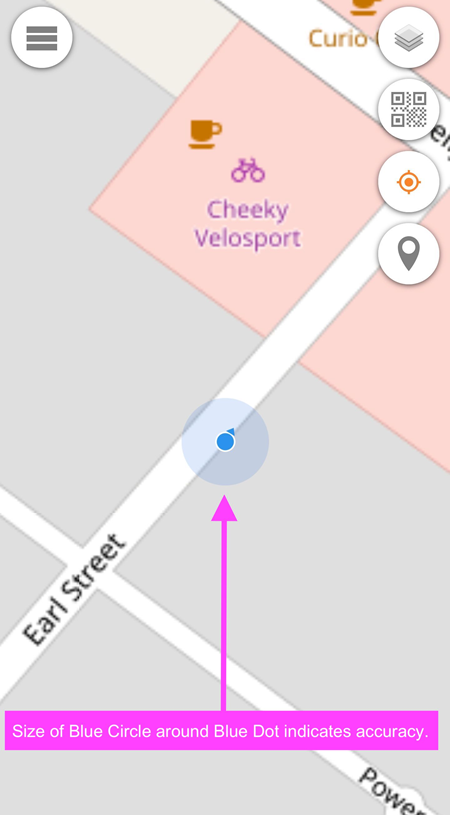
Apple and Google have massive geo-positioning capabilities, but accuracy on their mobiles is still not good enough for within metre positioning - this is where you can help.
If you zoom into the blue dot on your map, by spreading out with 2 fingers, you will see a blue circle around the blue dot, which indicates the accuracy of your location as reported by the blue dot (as shown below).
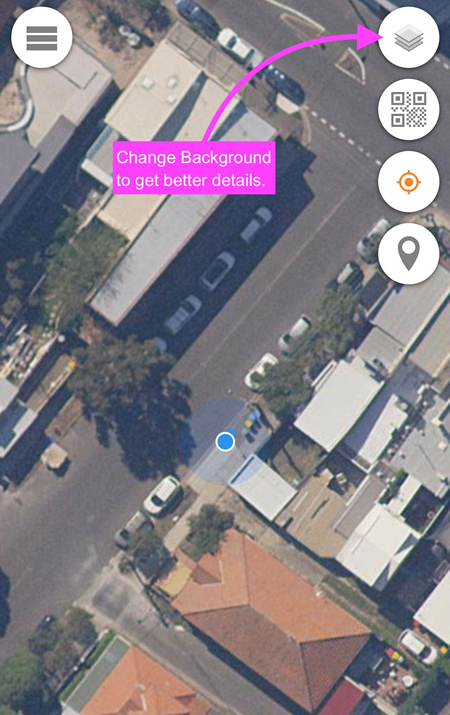
Some governments offer high resolution images for free (e.g. NSW Australia) which act as a great background map.
Below is the same view as above, but with the base map changed using Change Base Map button in the upper right of the screen.
For high accuracy placement, you can use the image background to see whether the blue dot is indicating your current position properly and only use Web Pin if it is acceptable.
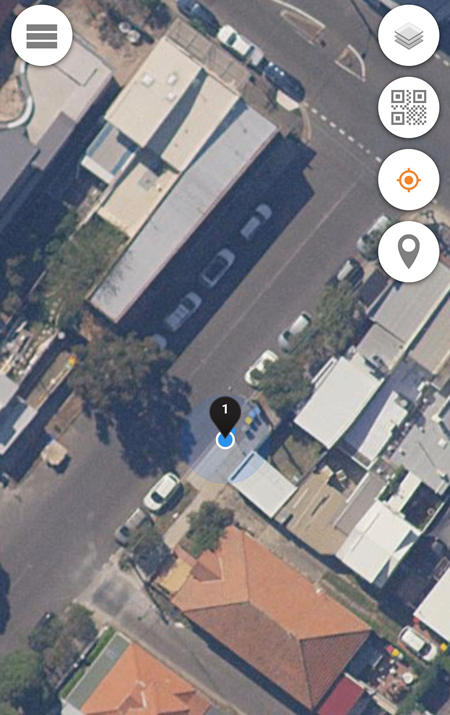
For example, as shown below, the user was standing next to a rubbish bin collection area.
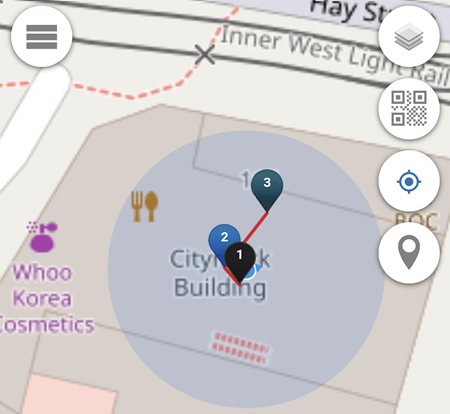
Web Pins are coloured Black. All Pins are numbered in chronological order (as shown below).
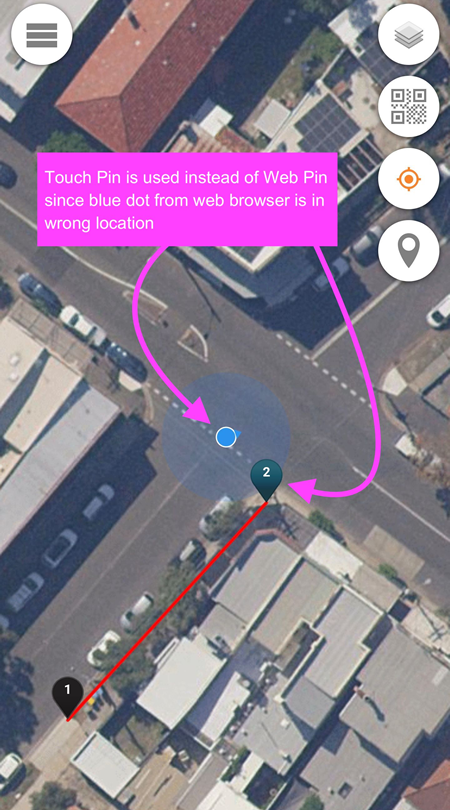
When the blue dot accuracy of your current location is poor, you can use Touch Pin to specify a more accurate position by selecting Touch Pin instead of Web Pin and then touching the map at the correct position.
For example, as shown below, the blue dot was in the middle of the road when the user was standing on the pavement, so the user clicked the Touch Pin button instead of the Web Pin button and touched the screen.
Touch Pins are coloured Green. There are lines linking all pins together in chronological order (as shown below).
4.3. QRcode, Barcode and Text scanning
Unlike the very limited COVID QR Code scanners, Virtual Vaccine can make use of any QR code, Barcode and Text images, e.g. overseas COVID QR Codes, Alipay, bus seats, home made QR codes etc.
A faster result is normally achieved when using the rear facing camera.
If the QRcode scanning is successful, a blue pin will be displayed on the map.
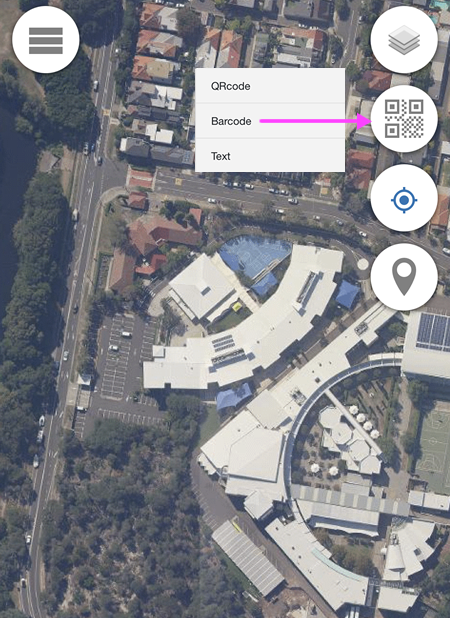
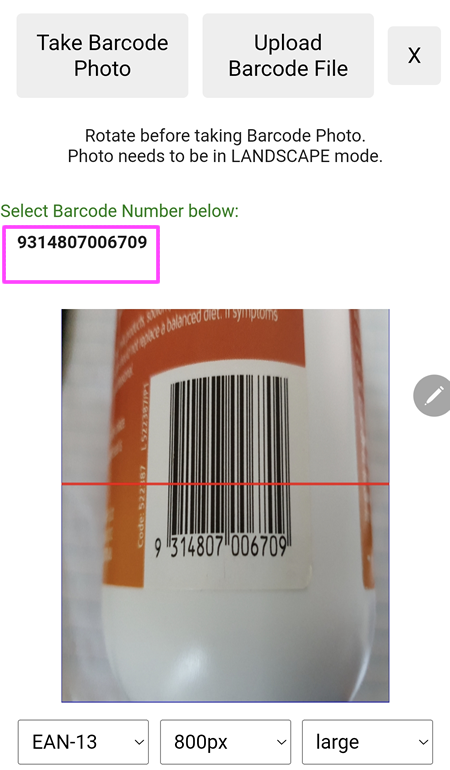
Barcode scanning
To take the photo, it must be done in landscape mode and if it is detected, it will be shown as below.
After clicking on the barcode result, a black pin will be displayed on the map.
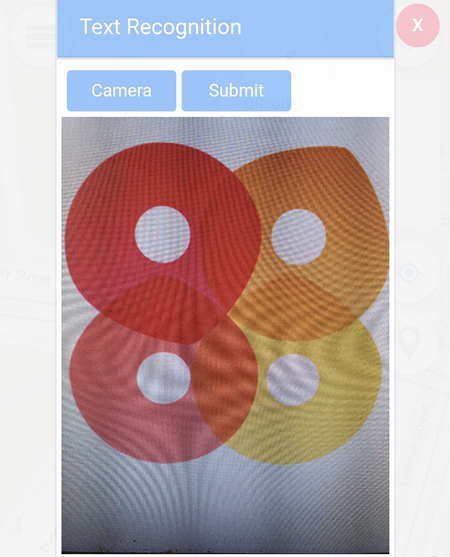
Text scanning
Use the camera to take a photo of the text or the image to be scanned.
If the result is successful, a black pin will be displayed on the map.
5. Progressive Web App
Personal Console is implemented as a Progressive Web App, giving it benefits like:
- Cross Platform - web browser based works across multiple computer (Windows, macOS, Linux) and phone (Android, iOS, Linux) platforms.
- Store Independence - no tracking by Google Play Store and Apple App Store what, when how you use your app.
- Offline Capable - use of Progressive Web Application allows operation without server and without internet.
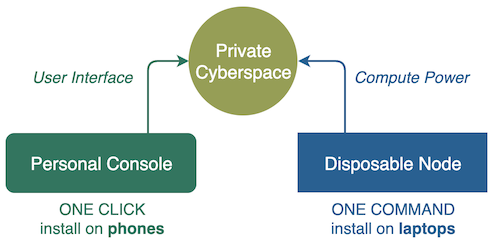
Web Console is the first step in building up your Private Cyberspace. Just point your browser to 88.io and you will be redirected to the nearest Personal Console launch point.
Personal Console gives you control of your Private Cyberspace through a web browser interface.
To ensure maximum privacy, it can operate OFFLINE without any network connection.
For details please visit Personal Console page.
After the click, your Personal Map available at https://app.contacttrace.com.au will be installed inside your mobile phone browser.
You can use it immediately to start building up your personal information assets by scanning COVID QR codes, Shopping Barcodes, Bus Shops QR Codes etc.
You can also install mobile apps to feed your Personal Map automatically with locations you have visited and wireless signals you have encountered (e.g. bluetooth signals from other COVID apps, TVs, earbuds etc.) while it remains in your pocket.
Unlike other apps, your have full independent control of Citizen Assisted Contact Tracing right on your phone. By default:
-
NO sending of DATA outside your phone.
When needed (say you tested COVID positive or someone offered you a bag of cash) you can selectively disclose some of the collected data.
-
NO running of SOFTWARE outside your phone.
Software (e.g. Personal Map itself) does not need to "phone home" to operate. In fact you can make a copy and start your own COVID fighting force independent of us.
As you gain more confidence in Citizen Assisted Contact Tracing, you can start to exchange data and rewards with other citizens under the protection of the Fiduciary Exchange.
Add Location Pins
To start you need to feed your selected Alias with some location.
Virtual Vaccine Modes
Although your PRIVATE Alias gives you perfect memory (e.g. history of your movements), when there is a large outbreak, it might takes too long to be notified out-of-band (e.g. through TV news) that you might be exposed and wait for you to submit your movement manually.
When there is an outbreak you can OPTIONALLY use your ANONYMOUS Alias to submit some of your data to the Fiduciary Exchange under the protection of novel technologies like Dynamic Alias and Fuzzy Block.
Instead of submitting data directly to the government, Fiduciary Exchange allows your data to be processed and shared differently under your FULL CONTROL depending on the current threat level.
-
ANONYMOUS Alias can be used in Defensive Mode - when there is no outbreak. You do NOT have to submit any data to Fiduciary Exchange, only basic automatic logging on your phone and manual scanning of mandatory QR codes, thus saving battery, data traffic and manual effort.
-
MEMBER Alias can be used on Offensive Mode - when there is an outbreak. You can send your privacy protected data into the Fiduciary Exchange, turn on intensive automatic logging and perform frequent manual scanning of voluntary QR codes or tapping on Virtual Markers in locations without QR codes.
The anonymity and speed of Exposure Notifications sent by the Fiduciary Exchange are controlled by the citizens themselves based on their own circumstances.
Fiduciary Exchange uses blockchains to scale up linearly according to demand and to protect against bad citizens with malicious intents. The more citizens, the more data, the more devices, the more anonymity, the more security.
Community Map
Citizens can choose to contribute public data to the Community Map available at https://map.contacttrace.com.au under the protection of the Fiduciary Exchange's Dynamic Alias.
People accessing the Community Map can use the different trust levels assigned by Fiduciary Exchange to get an indication of the quality of different information provided on the map by different Aliases.
From COVID test queue lengths to availability of Pfizer vaccine at a GP, any information relevant to the COVID fight is welcomed.
The Community Map is also using the Bluetooth and Wifi signals (collected as part of the Data Fusion function) donated by some citizen volunteers to to build a terrestrial indoor friendly Geopositioning Network. No need for foreign satellites and rockets, a national critical infrastructure built and owned by the citizens!
Being In Control
By storing your data on your device AND performing computation on them yourself, you retain control and thus ownership of your data.
For people who are used to submitting their data PASSIVELY to the Cloud, the freedom of controlling their data ACTIVELY can be a liberating experience.
Those who don't move, don't notice their chains.
- Rosa Luxemburg
Disclosing your data to enrich or to enslave, to protect or to attack, to gain or to deliver value ... now it is YOUR choice and no longer the Cloud's choice.
VIRTUAL VACCINE
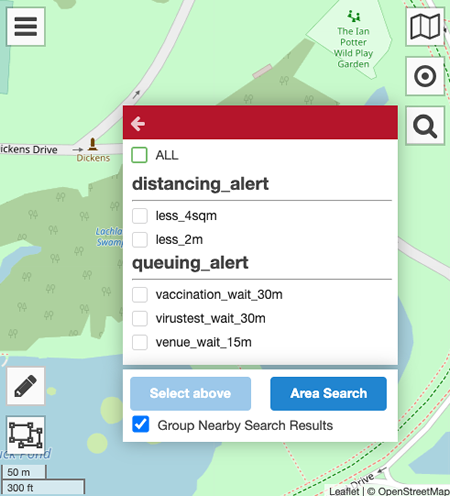
At least one pin is required. It can be a Web pin, a Touch pin, a QR pin or an Imported pin.
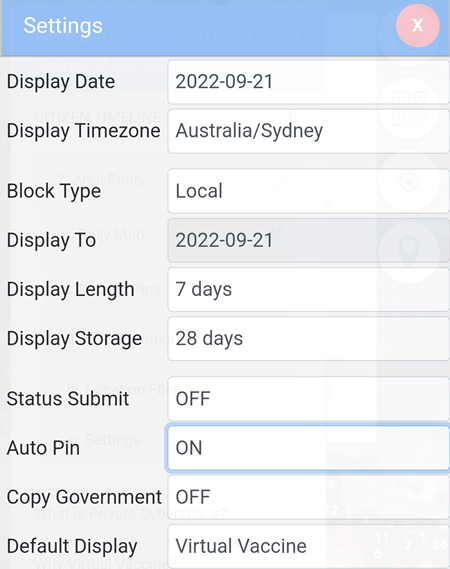
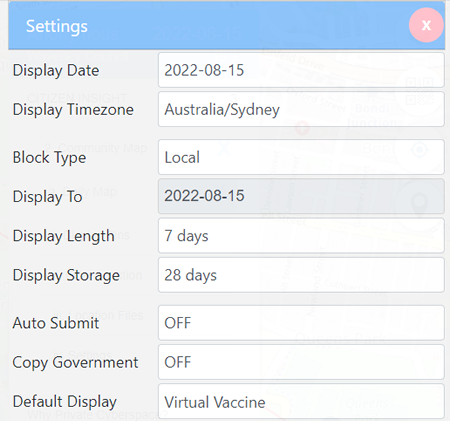
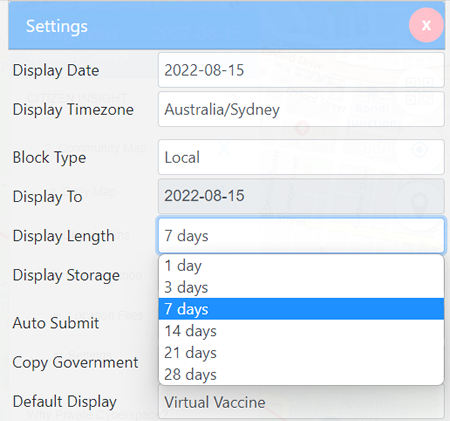
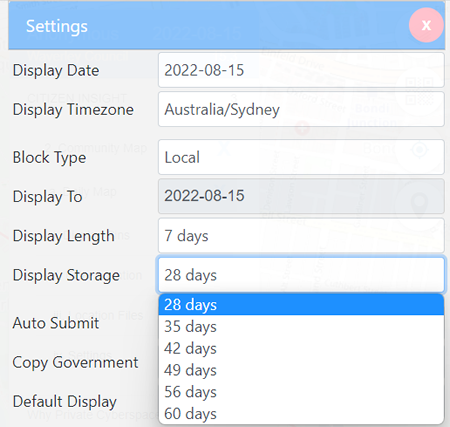
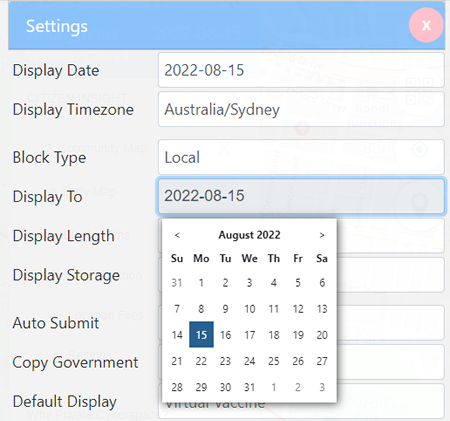
The pin settings is located in CITIZEN INSIGHT -> Community Map -> Daily Map -> Settings.
The pins displayed will be based on the values in the settings.
Display Date: show pins created on this date.
Display Timezone: show pins created with the selected time zone.
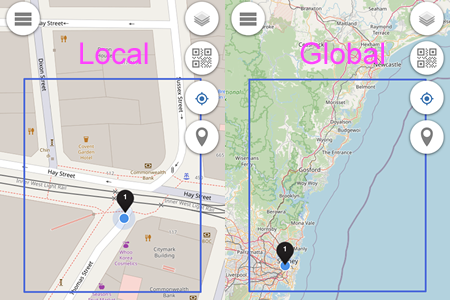
Block Type: Local (small area, 30 minute block) or Global (much bigger area, 1 day block).
Display Length: from 1 day to 28 days.
Display Storage: from 28 days to 60 days.
Display Date: pins created after the selected date will not be displayed.
Auto Submit: if turned on, it will automatically submit the last Covid status to every new pin created.
Copy Government: if turned on, it will send the status to a government agency.
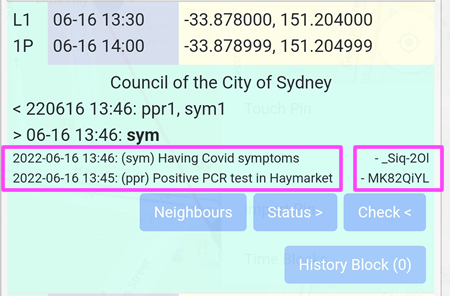
L1: Local block 1.
1P: 1 pin.
Neighbours: display and check Covid status submitted in the 8 surrounding blocks.
Status: submit a Covid status
Check: display the Covid status submitted within the same block (not available for users with "Private" alias).
Receive Message: display all messages sent and received within the same block (not available for users with "Private" alias).
Send Message: submit a message to other users within the same block (not available for users with "Private" alias).
The alphanumeric characters on the right are the aliases who send the messages.
Example:
"Having Covid symptoms" was sent by _Siq-2OI alias on 16-Jun-2022 at 13.46.
"Positive PCR test in Haymarket" was sent by MK82QiYL alias on 16-Jun-2022 at 13:45.
Data
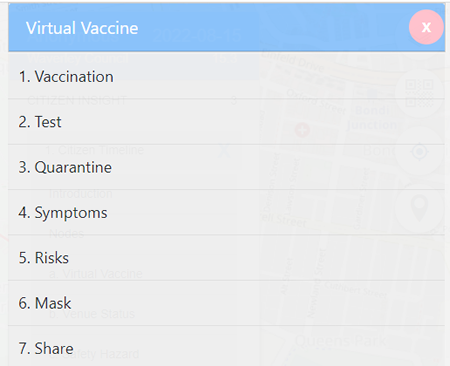
The data settings is located in CITIZEN INSIGHT -> Citizen Timeline -> Virtual Vaccine.
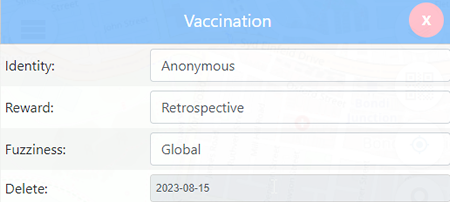
Vaccination, Test, Quarantine and Symptoms allow users to store the result. There is also an option to share the result.
Identity: Anonymous or Alias
Reward: Retrospective or Negotiate
Fuzziness: Global, Local or Exact
Delete: Data removed after the selected date
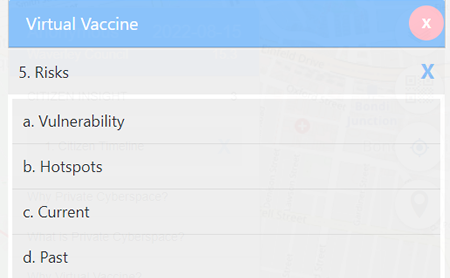
Risks
Vulnerability: Yes, No
Hotspots: Display areas on the map where there are Covid cases for up to the last 28 days
Current: Display the current location on the map
Past: Set the number of days
When you perform a ONE CLICK creation of your Private Cyberspace, a Personal Console software is installed into your browser.
Personal Console gives you full control your Private Cyberspace through a single user interface that works on most phones and laptops.
The Personal Console is frontend user interface of your Private Cyberspace, while the Disposable Nodes provide the backend computing power.
Personal Console described in this web page is for a Private Cyberspace that has been preloaded with applications selected by the contacttrace.com.au Cyberspace Integrator to:
- protect you identity - Dynamic Alias
- protect you community - Citizen Timeline
- protect your data - Infinite Disk
You are encourage to personalise it by changing the applications and their underlying infrastructures as you gain more experience with operating your own Private Cyberspace.
. Earn Coin Anonymously
You can OPTIONALLY fuzzify share some of the data you have collected anonymously.
If you would like to share some of the data you have collected
Earn your first coin by submitting anonymous status with your Personal Console.
To protect your privacy, PRIVATE Alias can only be used to privately COLLECT data for you, to SHARE the data collected anonymously with others you can create one or more ANONYMOUS Alias.
Go to DYNAMIC ALIAS -> 1. Personal Entity -> a. List and check the alias Type in top row.
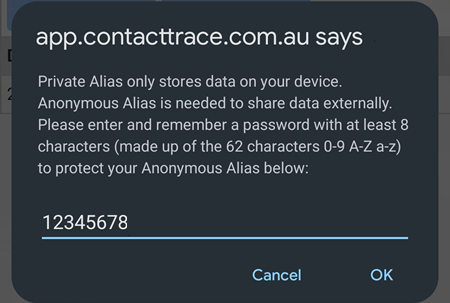
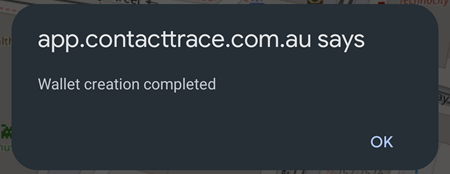
If it shows Private, tap on the Create Alias button to upgrade the alias to an Anonymous alias. Simply enter your preferred password and select OK.
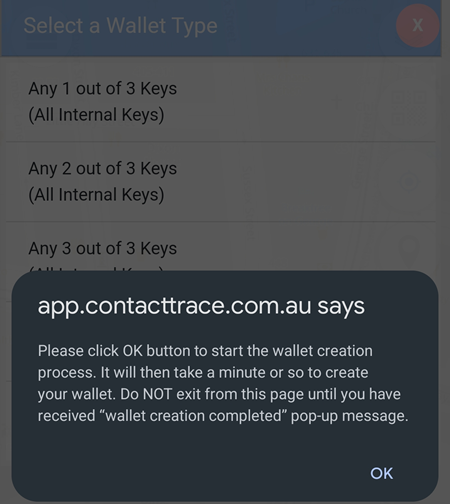
The Wallet (where the coins are stored) will also be created automatically. Select any of the keys displayed and select OK when prompted.
Once completed, a confirmation pop-up message will be displayed.
The alias file will be downloaded to your device. The Exchange number is the number of coins earned. In the example below, the number is 0, which means there is no coin earned.
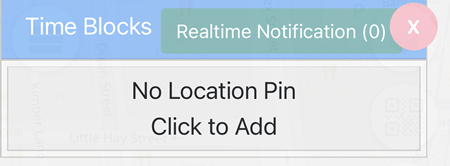
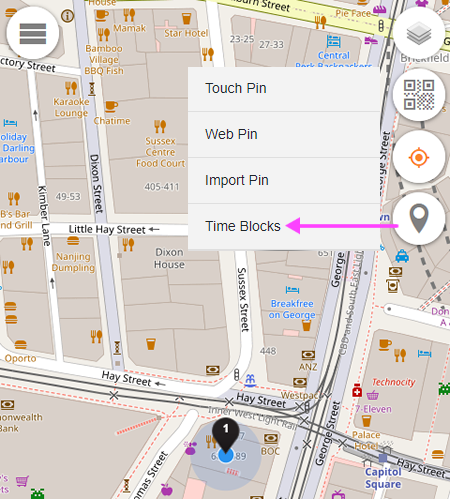
The next step is to add a pin on the map. In the example below, a Web pin is used. Once the pin is shown on the map, select the Location button on the right and scroll down to Time Blocks as shown below.
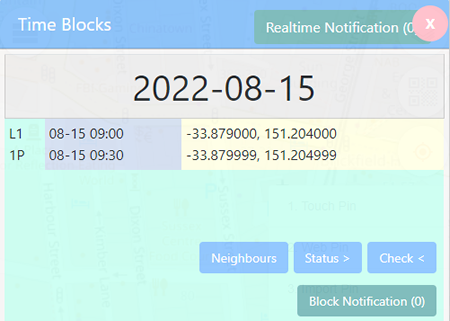
The Time Block window will be displayed. Select the Status button.
There are three status categories, Virtual Vaccine, Venue status and Safety Hazard, In the example below, Health - pcr positive (ppr) is selected. There is an optional message to be included after the status has been selected, e.g: Tested at a Haymarket clinic.
Once the status has been successfully submitted, it will be reflected in the Time Blocks.
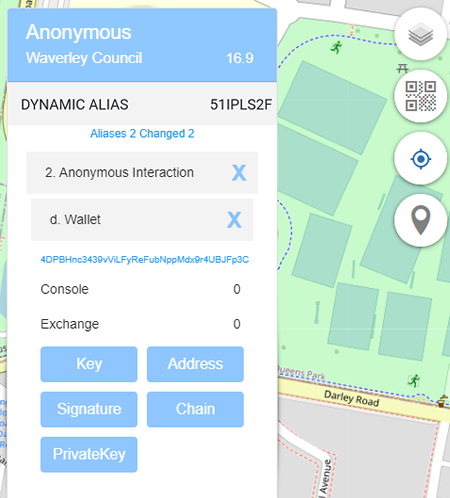
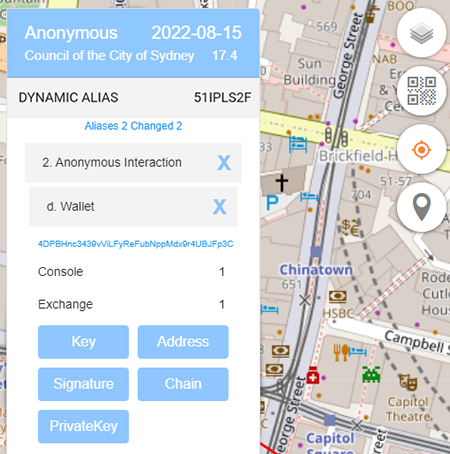
To view the total number of coins earned, go to DYNAMIC ALIAS -> 2. Anonymous Interaction -> d. Wallet -> Exchange. In the example below, one coin has been earned.
Aliases
A fundamental feature of Private Cyberspace is the protection of your privacy by enabling you to create different Aliases for yourself for different situations.
In this Quick Start Guide we will set up one each of the all 3 alias types available:
- Private Alias - use to collect data only (no sending out).
- Guest Alias - use to send fuzzy data anonymously.
- Member Alias - use to send fuzzy under progressive identity protection.
Private Alias
Step 1.
Create a new Private Cyberspace instantly with ONE CLICK.
The cyberspace will already have a Private Alias which you can use to collect your first data.
Step 2.
Collect your location into the Private Cyberspace using the Private Alias in just ONE SECOND.
If you just want to collect data PRIVATELY for now, you can stop after Step 2.
You just remain on Private Alias and keep collecting more data under it. You can analyse the collected data privately, and if desired later on, you can fuzzify some of the collected data and submit them to Citizen Synergy exchanges.
Guest Alias
Step 3.
Create a Guest Alias
Step 4.
submit the location you have just collected ANONYMOUSLY to a Citizen Synergy exchange.
If you just want to submit data anonymously, you can stop after Step 3. You can use remain on Private Alias and keep collecting more data under it. You can analyse the collected data privately, and if desired later on, you can fuzzify some of the collected data and submit them to Citizen Synergy exchanges.
Member Alias
Step 5.
Step 6.
Quick Start Done
If you have complete the above 6 steps, you would have all 3 different types of alias in your Alias List.